Volumetric fruits and vegetables made from paper templates. Application Fruits and Berries made of paper. Three-dimensional paper applique for children. How to make eclairs from plastic bottles
Fruit templates for cutting
A chest of useful things (we study fruits and vegetables).
I will show you the material that we have and which we use to conduct thematic weeks “Fruits and Vegetables”.
Flashcards from the "Tell the Children" seriesabout vegetables " and "Tell the childrenabout fruits ".
The cards are made of thick cardboard, on the back of which there is information about each vegetable, proverbs and sayings, riddles. Vegetables such as onions, tomatoes, and fruits such as tangerine, melon, orange, peach, lemon are depicted in cross-section. Visual The material is good for use in classes to familiarize yourself with the outside world (we actively use it in thematic weeks), for the development of thinking and speech, and in speech therapy games.

The lotto is made on cardboard, which is certainly thin, but for such a price I think it’s forgivable. You can spend a little time and cover it with tape, but I didn’t do this; as practice has shown, we are very careful in this matter. All the pictures are colorful and recognizable. A good lotto option at an affordable price!


You are asked to find all the fruits on the colored tab and help the hedgehog make compote. And together with the bunny, collect vegetables from the garden and prepare a delicious and healthy vegetable soup.


In addition to the cards laid out below, the game includes two more general cards (a bush and a flower bed), they come with puzzle cards with flowers and berries, which, accordingly, can be used in other themed weeks.

There are five flavors in the book (strawberry, banana, apple, grape, orange). 5 spreads, each decorated in its own color (red, yellow, green, purple, orange). For example: if the spread is yellow, it shows what vegetables/fruits come in this color (banana, melon, turnip, pineapple, lemon), about Each one is written with a riddle verse. We look, smell and solve riddles!)))


Together with the blue gnome we repeat the names of fruits, remember what colors apples, pears, etc. are. We learn that fruits contain vitamins and help babies grow faster. We help the gnome finish the painting he started.


I laid out the entire book.
You can bake apple strudel with your child!

Finger gymnastics (development of fine motor skills).
We chop and chop the cabbage,
We salt and salt the cabbage,
We eat three or three cabbages,
We press and press cabbage.
Finger gymnastics “Fruit palm”
This finger is an orange
He is, of course, not alone.
This finger is a plum
Delicious, beautiful.
This finger is an apricot,
Grew high on a branch.
This finger is a pear
He asks: “Come on, eat it!”
This finger is a pineapple, (alternately extend the fingers from the fist, starting with the thumb)
Fruit for you and for us. (point with palms around and towards yourself)

We enjoy working in the creative albums “Your Baby Can Do It” and “Little Artist”.
The pages in the album are thick, which is very convenient for working with paints. On one spread sheet there is a sample, on the other there is a palette of colors and a drawing that the child must paint himself.
And we make art and learn rhymes!
This is an applique album. There are no ready-made parts that need to be cut out and glued... but there is a tab with colored paper in the middle of the album, and the parts for the applique need to be created by yourself, by tearing and gluing to the base.
So we picked leaves for our apples and glued them to the cuttings!


Album on applique. It is suggested to cut off the parts from the tab with your fingers along the contour, but we don’t have enough patience for this yet... and I make the blanks in advance with scissors. Here is one of the tasks in this album, which is quite suitable for our TN.
In the task “Ripe Apples” we learn to draw apple circles, remember what color they are and repeat the prepositions “on” (tree), “under” (tree).


There is a sticker for every overseas fruit!
What is this growing in our garden? Vegetables?! Which ones? How many tomatoes, cabbage and carrots? How many vegetables did you get? We collect the harvest in a basket.


I posted some albums from the EMVM series
Fruits are not only tasty and healthy, but can be used for creative purposes!

Cut vegetables and fruits!
And the dolls are full and the parents do not remain hungry!

We introduce the child to vegetables that grow in the garden and fruits that can be picked from a tree in the garden. And together with the child we go to the store, to the vegetable department, to buy fruits and vegetables!


I posted the whole book
Trace along the outline (fine motor skills).

In the set: apricots, peaches, apple, pear, oranges, lemons, mango, pineapple, grapes, cherries, bananas, kiwi, pomegranate,
In the set: garlic, cabbage, cucumbers, peppers, tomatoes, cauliflower, onions, eggplant, radish, potatoes,
beets, radishes, zucchini, pumpkin, carrots.

You can make cut-out pictures like these from cards!

“What fruits are shown in the picture” (we train attention).

In total, from four cubes you can add 6 images: beets, cabbage, carrots, potatoes, cucumbers, tomatoes. During the game, visual-figurative thinking, the ability to work according to a model, visual memory, attention, and logic develop. The set of cubes includes 6 drawings with assembly samples.

We select pictures according to thematic groups.


I posted the manual in full
A voluminous paper pear is an excellent craft, light and interesting. The technique in which the pear is created is widespread; it is often used to give volume to objects and characters. A little earlier, a step-by-step overview of a voluminous apple was presented, and the only difference in the works is the shape of the paper fruit, since in all other respects they are similar.
What will you need for the craft?
- Colored paper. Green and dark green for pear and leaf. Also, the pear can be yellow and orange;
- Brown cardboard for the stem;
- A simple pencil, a glue stick, scissors;
- A pear template, printed or made in your own design.

How to make a voluminous pear out of paper?
Using a pear template, you need to cut out 9 pear-shaped blanks.


Set one aside and fold eight in half.

Glue the two folded pieces together so that they touch only one side. Making a pear is much easier than making an apple, since you can clearly see which side is which, so you can glue the parts together correctly, without confusing the top and bottom.

Glue 4 blanks, gluing the left side to the right.

The remaining 4 blanks should be glued together in the same way. You will get two voluminous pears like this.

For this craft you will also need a sheet of green paper and a stem of brown cardboard.

All the components are ready, now it’s time to assemble them into a whole fruit. To do this, you will need the remaining blank; you need to glue the stem to it.


But to make the craft, you also need to glue the remaining second part to the back side, consisting of 4 pear-shaped blanks glued together.

The final element is a green leaf. And the voluminous paper pear is ready.
Pear with, made in the same technique.

This fruit set will be a wonderful educational toy for your baby. But if you are already an “adult” and have long known all the fruits by heart, a bright paper still life will fill your room with summer freshness, adding a piquant sourness to the interior.
Ripe bananas, fragrant citrus fruits, juicy strawberries and honey watermelon are not all the fruits and berries that you and I will learn how to design today. Pustunchik has prepared many paper fruit templates for you, but making them is equally simple and quick.
All you need: white sheets, scissors and glue.
Print out color diagrams of fruits, cut them out and make curves along the dotted lines. Glue in the right places. Ready!


Let's take a closer look at the process of creating berries and bananas.

Look how delicious the berries, watermelon, lemon halves and kiwi look!

Strict geometric shapes of pear and apple.

... And finally - a “family” photo =)

Have fun and be inspired to create!
From very early childhood, your child has the opportunity to see a wide variety of fruits and berries, which means that even then he begins to get acquainted with them. The child gradually remembers what this or that fruit looks like and the name of, then begins to determine the properties and qualities of fruits and berries.
In this article, the News Portal “site” has prepared for you several options for voluminous paper applications on the theme of Fruits and Berries.
By doing arts and crafts with your child, you will not only be able to instill in him creative abilities, but also introduce him even closer to fruits and berries. In the process of creating an application, you can tell your child about the benefits of a particular fruit, adding thematic songs, riddles, proverbs and sayings, rhymes and jokes.
Well, now, let’s move on directly to the master classes on making Fruits and Berries paper appliques.
Applique Apple
Applique Apple made of paper

Such a juicy and tasty fruit as an apple is loved by all children and adults. Dedicate one evening to creating such a voluminous bright Apple applique.
To make an applique you will need a sheet of cardboard, a set of colored paper, scissors, a glue stick and a regular pencil.

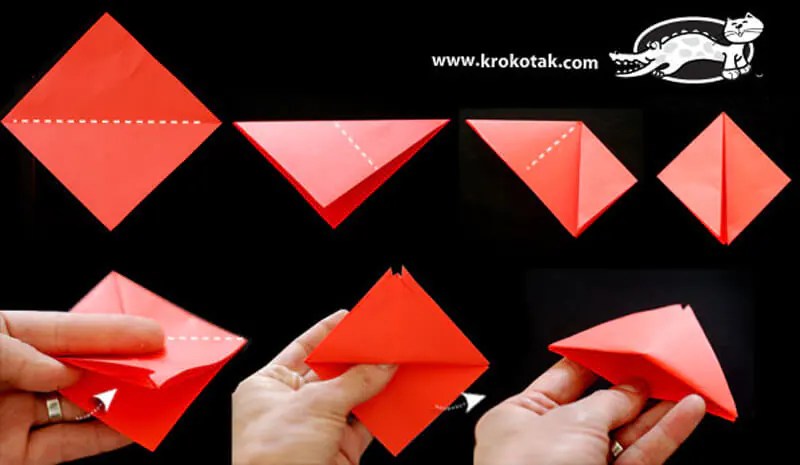
Cut a sheet of colored paper (in our case, bright red colored paper) in half. Fold the halves together and then in half. Draw the silhouette of half an apple with a pencil. Cut with scissors (see photo).

Now glue the resulting rounded halves to a sheet of cardboard, which will be the basis of our fruit appliqué.
We cut out a spine from brown colored paper, and a leaf from green colored paper. Glue the parts.
From a sheet of white paper, cut out the core for the future apple and glue it. Draw the bones with a black marker.
Strawberry applique
Strawberry applique
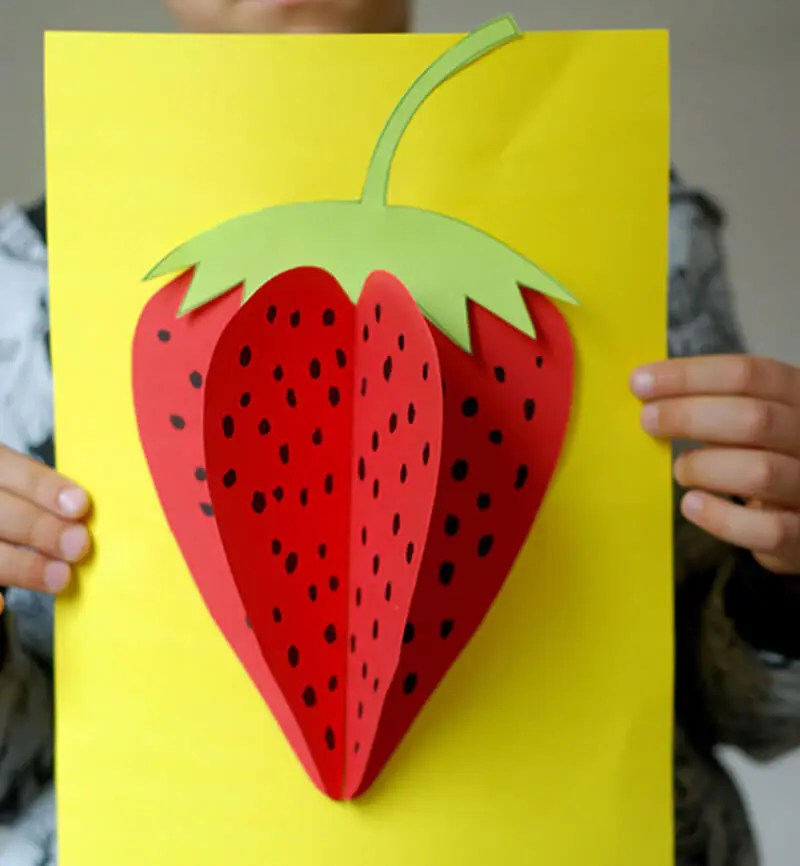
The principle of making this application is similar to the previous one. The only difference is to cut out the correct shape. This time the shape will resemble an oblong heart (see photo).


Decorate the finished applique with leaves (template included) and seeds drawn with a black marker.
Cherry applique
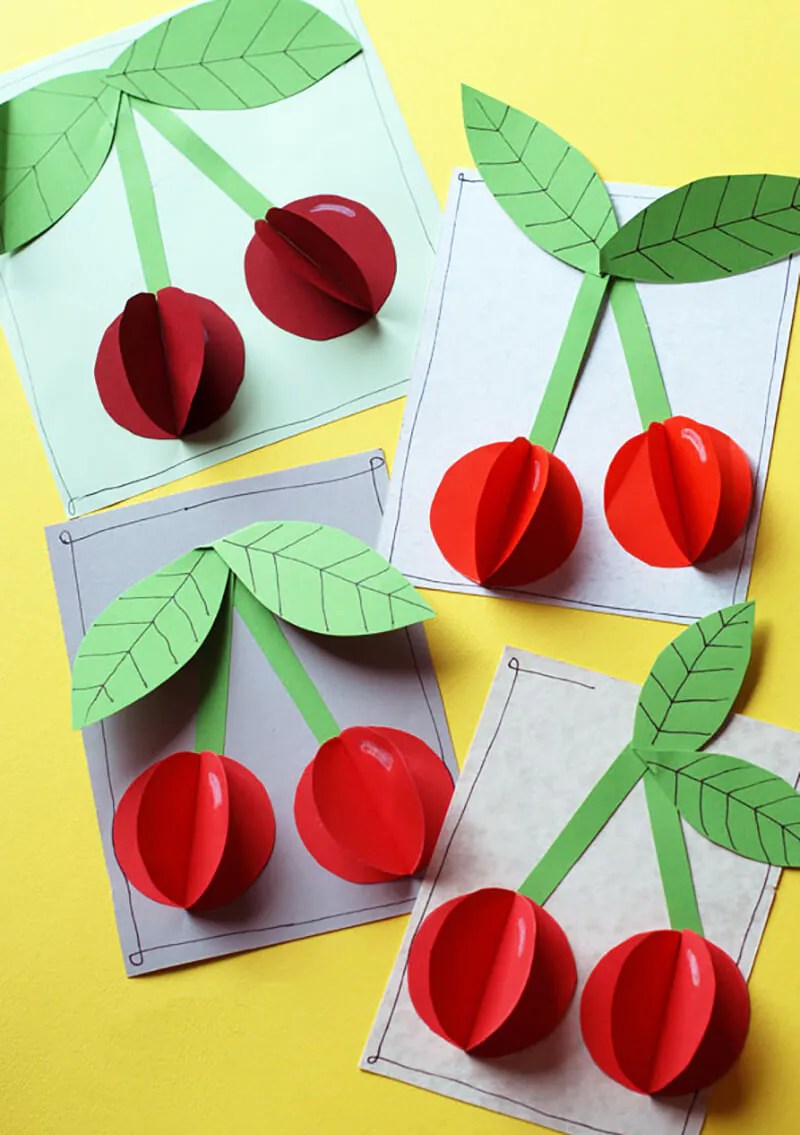
And another applique with the image of delicious cherries.


Having mastered this simple technique, you can make applique with your child of absolutely any fruit, berries and even vegetables. The main thing is to choose the right color and cut out the desired shape.