Crochet crocheted flowers with a description of how to tie a flower. We knit a planter - crochet decoration for a pot How to crochet a flower pot
You cannot buy such a cozy knitted pot in a store, you can only knit it with your own hands.
You will need a plain pot, yarn, hook. A pot will fit even one in which flowers are sold in a flower shop. The type of yarn doesn't matter either.
We will knit without a bottom. This is most convenient, because such a cover can be removed, washed, and the hole in the bottom of the pot will not be closed. Pattern for knitting a flower pot:

It is clear that this scheme is not suitable for all sizes of pots. Therefore, if you have a larger pot, then add rows of double crochets.
We collect a chain of air loops, equal in length to the circumference of the pot in the lower part, + 2-3 loops for a free fit. We will track the process with step-by-step photos:

We knit the first three rows. If the pot expands sharply upwards, then in the third row we add a couple of double crochets: 
Now we knit the pattern according to the scheme. The pattern is simple, I think there is nothing to explain here: 
We roughly estimate how much is left to the side, and knit to it, alternating rows of double crochets and rows of alternating stitches and air loops. Again, if the pot expands sharply, then in the rows of columns we double the loops in places. As a result, it will turn out, as in the lower part, a pattern with windows. And we finish with a wavy border - it fits like this: * five double crochets in one loop, skip 2 loops, b.n. column, skip 2 loops * - repeat. Outcome: 
This is what a crochet pot turned out to be. Thanks to the hem, the knitted part was tightly fixed. If for some reason it doesn’t hold on to you, then you can put “Moment” on the glue in a couple of places at the top.
Many of us have accumulated a lot of old flower pots, they are solid, comfortable and natural. The only pity is that over time they have lost their former beauty, but this is not a problem! For our old pot, we can crochet cute clothes - flower pots in the form of cute bunnies. Today's master class is dedicated to such a simple but effective planter for an old pot. It will not be difficult to knit it, so even beginner knitters can take on such a cute "clothes".
For knitted pots we need:
Knitting threads color coffee with milk;
Threads for embroidery are black and pink;
A flower pot.
Now let's start knitting pots:
1. We will crochet a chain of 5 air loops and on the sixth we will close them into a ring. We knit the second row with single crochets.
2. With the same single crochet we will knit a circle equal to the diameter of the bottom of the pot. By the way, it is better to take thicker threads for knitting so that they keep their shape and last longer.
3. When the bottom of the pot is knitted, go through one row with a half crochet to mark the bottom line, and then continue to knit subsequent rows with a single crochet. In order to reach the side walls of the cache-pot, the first row after the row with a half-column should be knitted behind the back wall of the loops of the previous row. So we get a clear and beautiful line of the bottom of the pot.

4. We will knit the walls of the planter without removing the flower pot - this way they will lie better and you will be able to adjust the size of the walls of the planter depending on the size of the pot.
5. When the cache-pot is connected, we will tie long ears like a hare's with the same half-column.

6. We sew the connected ears to the edge of the cache-pot, embroider the eyes and nose with black threads, and then with pink threads - the necks of our bunny.

So our cute clothes for an old flower pot are ready. Now any flower will look uniquely stylish in it. It will be very interesting to look at the interior with several such planters - hares. May your home always be warm and cozy. And old things that have received a new life will give your home a special comfort and warmth!
Flowers are always beautiful and sweet. They will always be the decoration of your apartment. And when it is not possible to plant fresh flowers, you can simply tie them. The remnants of yarn, which are left in large quantities by knitters, are perfect for this business.
Tools and materials Time: 4-6 hours Difficulty: 2/10
- Hook: 3.5mm; 3.75mm;4mm; 4.5mm
- Yarn - various leftovers: dark brown for pot and soil; green for leaves and stems; yellow, red, blue, blue, lilac for flowers
- Scissors
- Needle for stitching knitted things
- Filler (synthetic winterizer, sintepuh, holofiber, cotton wool)
- Plastic pot
- Wire
- Beads
- We will need hooks of different sizes for knitting all kinds of leaves.
In this master class, crocheted crocheted flowers in pots with diagrams and descriptions will be presented.
Abbreviations:
- vp - air loop
- sc - single crochet
- ssn - double crochet
- s2n - double crochet
- s3n - a column with three crochets
- ss - connecting column
- pst - half-column
Step by step description with diagram
So, let's start making flowers in a pot, which we will crochet
Step 1: Knit the soil
Let's start manufacturing with the soil, on which our leaves and flowers will be attached in the future. The soil is a circle that we will knit from dark brown yarn and for work you need to take a 4 mm hook.
Let's start with a set of 4 ch and enclose them in a ring.
Tip: The tail that remains from the set of loops must be hidden (so that the product does not bloom in the center). To do this, tie the ponytail together with the sbn ring.
1 row - we do 2 ch for lifting and we knit another 7 sc. As a result, we should get 8 sc. (photo 1)

2 row - we make an increase in each loop. To do this, we knit 2 sc in each loop of the second row. It turns out 8 such increases. As a result, we have 16 sc.

3 row - we make an increase in every second loop. In the first loop we knit one sc, in the second two sc. We repeat this sequence 7 more times. As a result, we get 24 sc.
4 row - we make an increase in every third loop. In the first and second loop we knit one sc, in the third two sc. We repeat this sequence 7 more times. As a result, we get 32 sc.
5 row - we make an increase in every fourth loop. In the first three loops we knit one sc, in the fourth two sc. We repeat this sequence 7 more times. As a result, we get 40 sc.
6 row - we make an increase in every fifth loop. In the first four loops we knit one sc, in the fifth two sc. We repeat this sequence 7 more times. As a result, we get 48 sc.
7 row - we make an increase in every sixth loop. In the first five loops we knit one sc, in the sixth two sc. We repeat this sequence 7 more times. As a result, we get 56 sc.
8 row - we make an increase in every seventh loop. In the first six loops we knit one sc, in the seventh two sc. We repeat this sequence 7 more times. As a result, we get 64 sc.

Continue inc and knit in the round until the soil fits into the top of the pot. Then we cut the thread and hide the end of the thread in loops on the inside of the soil using a hook or needle for sewing knitted things.

Step 2: Knit the leaves
We will knit the leaves according to the following scheme:

Leaflets need to be knitted in three sizes and each size for 4 pieces. To do this, we need hooks of different sizes - 3.5; 4; 4.5 mm and green yarn.
The small sheet is knitted first. It needs a 3.5 mm hook and the sheet will be about 1.5 cm long. We take a hook, yarn and make 7 ch. First we knit the right side of the leaf. In the third and fourth loop we knit one dc.

In the next two loops, we knit one s2n.

In the last loop of the right side we make three c3n.

Then we turn our work and knit the left side of the sheet. In the first two loops we knit one s2n, in the third - 1 dc, and in the last loop we make 1 dc and 1 sb. Next, in the first loop of the first column of the right side we knit ss.

We make 4 ch to form a stem, fasten the thread and leave a tail of 10 cm.

Here is our small sheet and ready. We knit 3 more of the same sheet.
We knit the middle sheet on a 4 mm hook, and it turns out to be about 1.7 cm. The middle sheet is knitted in the same way as the small sheet, except that in the last loop of the right side we knit five s3n. We also knit 4 sheets.

A large sheet is knitted similarly to the middle one. We only take a 4.5 mm hook for work. In length, it turns out to be about 1.9 cm. We also knit 4 sheets.
As a result, we should have 12 leaves of different sizes.
Step 3: Knit flowers
To make flowers, we take hook No. 4 and yarn (any color to choose from, for example, lilac).
We make 4 ch and enclose them in a ring (leaving a tail, cm 10).
1 row - knit 10 sc.

2 row - do ch 3 to lift. Then, in the first loop of the second row, we need to knit two pst with a crochet. To do this, we make a crochet, insert the hook into the first loop of the second row and pull the thread. We have three loops on the hook. Next, grab the thread and knit it through the first two loops. There are two loops on the hook. We knitted the first pst with a crochet. In the same loop we make another pst. We should have three loops on the hook. And now we stretch the thread through these three loops and one loop remains on the hook. We make 3 ch and in the second loop we knit ss.

So we have formed the first petal of a flower.

We repeat this sequence four more times. We fix the thread and again leave a tail, cm 10. It turned out a flower with five petals.

Now let's make the stamens for the flower. We use a 3 mm hook and yellow yarn.
We collect 5 ch and in the third loop from the hook we make ss. It turned out the first pico. Then we collect a chain of 3 ch and knit sl-st in the first loop of the chain. We repeat this sequence two more times. We fix the thread and cut it off, leaving a long tail. We insert the thread into the needle and pass it through the loop before the first picot, and then in the middle between the second and third picot and tighten.


Also, stamens can be made from beads and wire. We string the beads on the wire and also insert them into the middle of the flower.
We knit 5 more such flowers.
We knitted all the details of the flower. Now it remains to collect them in the composition. First, we sew large and medium leaves to the soil, and then small leaves.


Here are the flowers in the pot we got.

We presented you crocheted crocheted flowers and leaves with diagrams and descriptions in a plastic pot, but you can knit the pot with your own hands or tie it with a plastic one.
A description of how to crochet a pot is presented below.
We take a 5 mm hook and yarn of any color. We do 6 ch and enclose them in a ring.
1 row - do 3 ch for lifting, then 2 more ch and knit dc. Then again we do 2 ch and knit dc. We repeat this sequence 10 more times. Thus, you should get 12 dc.
The main knots of macrame have already been mastered, you can start making the first simple product using the macrame technique - flower pots. To make your flower pots beautiful, we tried to make a selection of master classes on weaving flower pots using the macrame technique with our own hands.
See how modern and aesthetic these planters look.
DIY Gardens of Babylon

beautiful wall decoration
A cache-pot is not a whim for plants at all, and all flower lovers know this. Ampelous, climbing plants feel best, and accordingly look, in hanging planters.

Plants in the interior look much more elegant if the flower pots are decorated with weaving using the macrame technique.

Material for pots
What material is needed for macrame planters? The material must be durable, not easily soiled, pliable, resilient, not slippery.

To weave knots, so that they turn out to be clear and expressive, it is necessary to be tight enough.
As for the color scheme, everything here is up to you. Here are some examples:


Pots for several flowers can be as one color ...


Basic rules for creating a simple planter (for beginners)
1) Choose a scheme and a suitable material.
2) Cut the threads into segments of the desired length.
3) We fasten the threads on a working basis. You should get four ends (sometimes three or another number).
4) We make a loop for hanging pots. Often use a ring for fastening.
5) Then we begin to knit twisted. They need to be tied four of the desired length (or another number, according to your plan).
6) We measure the diameter of the pot so that it fits well in the pots.
7) We select the scheme of knots with which we will braid the base - a flower pot. Most often this is .
8) We knit a recess for a flowerpot.
9) At the end, we fix the work with a tight knot so that the flowerpot does not fall out of the pots.
10) Cut off the threads, leaving long ends. They can be fluffed up or beads can be attached to them to give the product an original look.

The scheme of weaving flowerpots using macrame technique for beginners
You will need:
- cord with a diameter of 5 mm (length 40 m)
- metal or wooden ring with a diameter of 4.5 cm

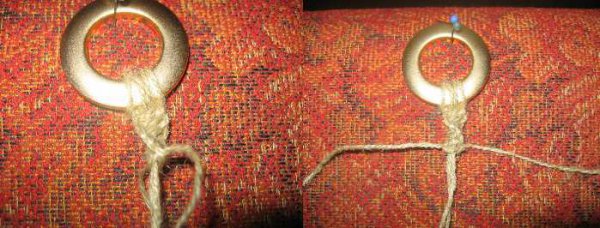
Cut the cord into 8 pieces of 5 m.
Fold the thread so that one end is 3.5 m and the other 1.5 m and fasten it to the ring. Make a loop by bringing it under the ring. Bend it over the base towards you and pull the ends of the thread into the loop. Lock from below.

Fasten the parts of the rope on the ring so that 2 long (working) ones are located at the edges, 2 short ones (axial) between the long parts.
So that the threads do not interfere, tie them into a skein and secure with elastic bands

Weave pots handles
Divide all the threads into 4 groups (2 long and 2 short parts). Weave single long pieces of rope.
You need to tie about 30 knots or about 50 cm (their number depends on the thickness of the rope and on the required length of the product).

Secure the twisted chain with two flat knots:

In the same way, weave three more twisted chains.

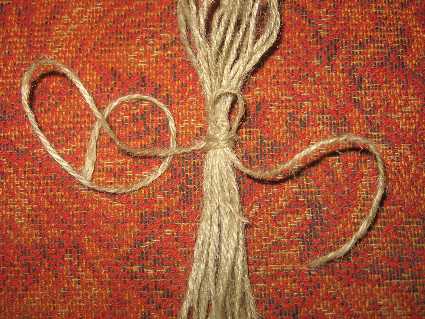
Weave a basket for pots
To do this, weave 1 flat knot with two right ropes from one group and 2 flat knots with left ropes from the group closest to the right at a distance of 8 cm from the last knots. We repeat 4 times, sequentially including all the ropes in a circle.

We measure 8 centimeters ...

... we fasten the threads with a flat knot ...

Knit three rows of warp.

Step back a little from the last knots and use the braiding method to gather the ropes into one bundle.

Braid method
The braid must be very strong so that the flower pot does not break!
We pull all the threads into a bundle. We take a piece of thread, fold it in half and add to all the threads with a loop up.
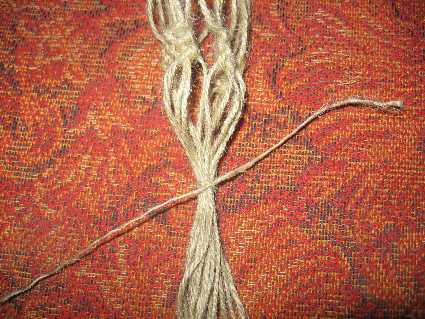
With one thread from the bundle from top to bottom we make several turns.
We insert the end of the cord into the loop and pull the ends of the loop down so that the cord comes out from below under the turns. We stretch the second end of the loop up and pull it under the winding.

We carefully cut off the upper end of the thread, and hide the lower end along with the rest of the threads.

Braid weaving pattern
Leave the length of the thread for the brush about 20 - 30 cm, cut the ends with sharp scissors. The pot is ready!
Video tutorial for weaving a simple planter for beginners:
Cache-pot two-level "Yuliana" in macrame technique
Most often, a planter is woven for one flowerpot, but it can be two- (or more) level. The shape, size, patterns, material for it are also very diverse.
Cache-pot "Yuliana" is woven from an ordinary linen cord. It is designed for two flowers, located above and below.

Finished product length about 70cm
Required material:
- linen cord 5 mm thick (length 40 m)
- 2 rings with a diameter of approximately 4 and 6 cm
- 8 beads for decoration
The order of weaving planters "Juliana"
1) Cut the cord into 8 pieces of 5 m each. Mark the middle of the thread.
2) We make a ring for fastening. We take 4 threads, put them parallel and horizontally to each other. From the marked middle we weave “up” and “down” about 8 flat square knots. This resulting lace is folded in half and threaded through a ring of smaller diameter. And if you don’t have a ring, then weave a few more knots, make a “loop” and tie 1-2 flat knots on all cords to strengthen. Another option is to secure the thread by braiding.
3) We divide 8 ropes into 4 groups of 2 pieces and weave about 6-8 knots. It can be replaced with ordinary flat knots or weave a twisted chain.
4) We fix it on the second ring, stepping back from the last knot 5-6 cm, with horizontal rep knots. Between these cords we hang the remaining threads, folded in half. Now we have 16 threads at work.
5) Weave beads. We divide the threads into groups of 4 pieces. We knit 8 flat knots in each group, first weave one bead for decoration. Then we weave 2 more flat knots, weave the second bead and again 8 flat knots.
6) Weave the base for the first pot. We retreat 5 cm from the last knots, weave twisted chains, working with threads from neighboring ropes, shifting the knots.
7) Check if our flowerpot fits. If it does not fit or, conversely, falls out, untie the knots and tie correctly. Weave twisted chains about 20-25 cm. (Their length depends on the height of your pot.)
8) Weave the base for the second pot. We retreat 10-12 cm from the last knot, using 2 threads from adjacent chains, weave one flat knot at a time.
9) Again we retreat 12 cm, we collect all the cords using the braiding method.
Be sure to try on the pot when you finally fasten the threads. This will be the place for the second pot. It must fit securely in there.
10) The design of the "brush". Step back 25-30 cm and cut the cords. You can fluff them up, untwist them, or add beads for more decorativeness.
To make it clearer, watch the video on how to knit Juliana planters:
Cache-pot openwork pattern "Butterfly"
To weave such an openwork planter you need:
- rope - 50 m
- three rings with a diameter of 7 cm, 10 cm and 21 cm
- scissors
- thread fastening pins
- work cushion
- hook for fastening pots

Operating procedure
1) Cut the threads: 3 parts of 8 m, 6 parts of 3 m, 2 parts of 1 m, 1 thread - 2.5 m
2) Wrap the rings with a diameter of 10 and 21 cm tightly with a rope so that there is no gap. A ring with a diameter of 7 cm must be braided with double flat knots with a thread 2.5 m long.

Schemes of the main macrame knots of this planter
3) All the threads, marking the middle, lay vertically and secure in the middle with pins.
Place the shortest (meter) along the edges. With these threads on both sides of the middle, tie 8 cm chains of double flat knots. All other threads will be the basis.
4) Distribute the threads into 6 (long - along the edges) and in each part, first tie in a chain of 4 double flat knots, then perform 4 more of the same knots, leaving 3 pico air loops between them (Butterfly pattern) , rice. 6).
5) Fasten the ends of the chains with horizontal rep knots ( rice. 2) on a ring with a diameter of 10 cm. Next, weave first 3 "butterflies", and then simple chains of 4 knots without pico. Pull the bundle of cord under the chains using the “braiding” method.
6) Again, divide the threads into groups of 6 and tie 3 hanging cords 40 cm long. Each weave like this: first with single flat knots 17 cm of a twisted chain, then a “butterfly”, then a “pea” ( rice. 8), again a "butterfly" and then 13 cm of a twisted chain.
7) Attach the ends of the hanging cords to a ring with a diameter of 21 cm, tying 3 threads in between them (a total of 9 threads of 1 m, folded in half). On every 6 threads under the ring, perform a "butterfly".
8) Connect together the two extreme cords from adjacent butterfly patterns and tie 6 chains of 6 double flat knots, and leave the two inner ones free. We make a bundle of all the threads and tighten using the “braid” method.
We decorate the ends of the cords with “rollers” ( rice. 12). The length of the connected brush in finished form is 25 cm.
Video tutorials on weaving flower pots using macrame technique
Channel Macrame style will teach you to weave a two-color openwork planter for indoor flowers:
Channel macrame school learns to weave a hanging planter with round beads:
Channel Panduro webtube shows how to weave the simplest pots with large beads:
The originality of the macrame technique is that by spending a little money and time, you can decorate your home with a useful and pleasant decor element.

- The work of Hope.
The description and diagrams are taken from the book Crochet Flowers. The cactus consists of a trunk and two separate processes.
Knitted primrose flowers in pots - the work of Irina.
For knitting primroses, I used a 1.5 crochet hook, Bebe alize thread for flowers and a pot, and yarn art angora de luxe for leaves. The consumption is very small.
A master class on knitting daisies can be viewed.
Daffodils. One of my first works. I knit recently, about the second month. I really like the process of knitting. I take the diagrams from the Internet.
Author Olga. Flowers and leaves are crocheted from acrylic yarn "KARTOPU", and the pot is made from semi-woolen yarn.
Hook No. 1.75, product weight 230 gr. Used: yarn 200g., wire 90cm, synthetic winterizer. 7 flowers, 11 leaves, bouquet height 28.5 cm.
Flowers, leaves and a pot are crocheted of semi-woolen yarn.
Hook number 1.75. Product weight 230 gr. Used: yarn 200g., wire 90cm. Sintepon. Height 27 cm.
As a vase - a tied plastic bottle. I did not glue the middle of the flower, but sewed it on. It is better not to starch the flowers, but to moisten them in sugar syrup and shape them while they are wet. Pre-wind the wire with not thick yarn, then bend the end of the wire with pliers. Then glue the flower to the wire.
You will need: for pots - the remains of pink yarn, as well as white mohair and black or gray wool mixture (yarn should not be thin); for cacti - green yarn; for flowers - pink and yellow melange; hook number 3; molds for pots (for example: plastic containers for dessert).